Thursday, December 6, 2012

Handmade medicine cabinet and wall shelf
So here are my latest creations. A medicine cabinet and wall shelf for our new main floor bathroom. Oh what a luxury it is to have a bathroom on the main floor of our house again. Since we moved here in May our 1914 year old home did not have a bathroom on the main floor. It's a fairly small powder room, however it's right next to the kitchen and family room. With having youngsters it's such a treat because I don't have to cart them the stairs anymore just to use the toilet and make sure they stay out of trouble. It's all conveniently packed into the family room. So what's a stay at home mom to do when decorating a bathroom on a tight budget. Turn to building! I have learned a lot about myself these past couple of months, that I truly am compatible of doing things I didn't think were possible. If I just open my mind and try - I can learn to do anything.
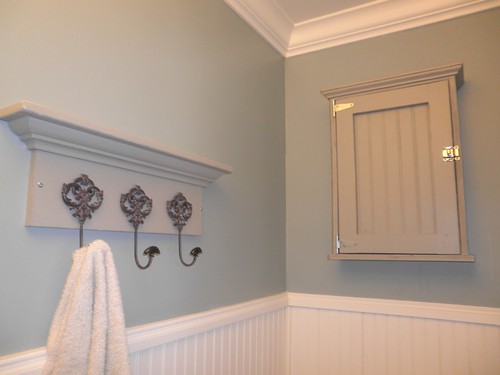
The wall shelf was simple. I used a scrap 1x6 for the backside, 1x3 on top for the shelf part and finished if off with crown moulding and return mitres. 
The medicine cabinet I had to design from scratch as I wanted the crown moulding on top. For the finish - I matched the paint to the mirror I got at home sense with my bday money. I first painted it a chaarcoal grey then a taupe/grey mix - then lightly distressed the edged for the charcoal grey to show through.
So on to the totals:
Wall shelf : all the wood used were scraps from from projects and I got the hooks for $5 in the summer from a garage sale.
the medicine cabinet cost $20 in wood - the b-board was scrap.
with paint the total cost of this project was less than $50 as I have a ton of paint left for other projects.

(not bad when the cheapest medicine cabinet I could find was 130$ for a cheap melamine cabinet

Monday, October 15, 2012

Sewing? O where have you been?

We recently moved into our new 98 year old home in May of this year. It's been a while since I've sewn despite having a dedicated room to sew in, I don't really have the time or ambition to sew much right now. I like an organized sewing room not a messy one. I can't even move in it because boxes are still everywhere in there. I can't find a thing. I was thinking of unpacking it but why really? when I will just have to repack it to bring it up to the attic area in (hopefully fingers crossed) near future. So what did this crazy sewing nut do, I brought my sewing machine downstairs, LOL. I wanted to make this really cute valance that I saw on pinterest. I loved the colour of fabric I choose. They were really simple to make and a quick sew - just the perfect sewing project to get me in the mood again to sew.
But truth be told it will be a while before I can sew like I used to, again. So much stuff to do to this house. WIth having 3 boys all 4 and under makes diy time - fix up your house time (when they are sleeping). So instead of sewing I learned how to build things. Okay truth be told I would never thought in a  million years I would be able to build things but I like what I like and I really can't afford the stuff I like (sometime being a stay-at-home mom has some minor disadvantages - $ - mind you even if I had a full-time job I still wouldn't be able to afford the stuff I like lol ;) ) While looking up ways of refinishing furniture to make this house our home, I stumbled on Ana white's website, and learned of one of the best tools The kreg jig. I love it and now so does my house. I decided to build a bookcase for my kids' toy room. It turned out amazing and I truley love the colour. Only thing is that now I want to redo the curtains in more of a nautical theme. My dh gave me a hard time with this as it took a lot of time to do - when it comes to power tools, you can only use them during certain times of the day (not at nap time and not when the kids are sleeping cause the neighbours will get mad too) so it left my dh as solo daddy daycare for 2 whole evenings but really thats not that much in the grand scheme of things. It definitely made me more self-assured that I can do it too.


PA090017

I also decided to build the boxes using 1x4's and up cycled plywood from the fugly built-in from the dining room. I image transferred a clipart image on to the boxes to denote the contents. Then I added twine for some handles and stained them with the stain I got from BM as-is section for a whooping $5.00 for nearly 3/4 of a gallon 

PA150016 PA150015

Monday, April 30, 2012

Sewing update!

Wow where does the time go?  We finely found a new (old 98 years to be exact) house that has the potential to be a great house for our family. We are moving in less than two weeks. The unfortunate part is that the my beloved sewing room has been taken down (as it's coming with me) here is what is used to look like.
Sewing Room machine table
The exciting thing is that I get to design a new sewing space all to my self, in the attic of our new home! I just wonder how long it will be before I have a completed sewing room again. When we move my sewing room will go into the 5th bedroom which we have named the "cottage cheese room" because the texture on the wall bears a striking resemblance to that of cottage cheese. The house has great potential but it needs a lot of tlc/updating. It hasn't been updated in 20 yrs.
virtual-tour-50025-49-1299590060-enlarge
We have been looking for a couple of years for a house that meets our criteria, however it became evident that unless we put some hard work into fixing something up, that we would never be able to afford what we wanted/needed in a house. To be honest, I never really wanted to move mainly because I love our house and it would have been paid off in 14yrs but unfortunately this house is just becoming to small for our growing family. 

Sewing
The last bit of sewing that I did before the sewing room was dismantled and put into boxes for storage was this purse - Simplicity 2685 View D. It was one of the items that went into a door prize for a mom to mom sale that our church organized. The money raised form the sale will buy mosquito netting for families in Africa, to prevent malaria. I have sewn from this pattern before but I didn't sew the flap on it the first time. I like how it turned out but realized after that I didn't follow the directions on this one as the top portion of the flap is supposed to be sewn into the top seam. Ah well, lesson learned (maybe) next time follow the directions!
P3150017

Jalie 3132
Jalie 3132
I had to have this pattern when it came out. The funny thing is that I purchased it with the intention of making the nursing version of the top however felt that I really liked non-nursing version better. The only change I made was to add a contrasting binding to the kangaroo pocket using my cs machine. I used cotton interlock from fabric.com for it and it feels great.

Friday, January 20, 2012

Christmas Sewing 2011

PC180021
Ottobre Woman 5/2011
PC180020
Ottobre Woman 5/2010 #11 Nanette
Ottobre 06/2004 #2 Footed pants
Ottobre 6/2004 #2 Footed pants

Stretch and sew 2085 yoked nightgown
Stretch and Sew 2085 Yoked nightgown
PC060009
Lavender eye pillow
Christmas pjs
Shirts: ottobre 6/2010 #15 undershirt pattern
Pants: Ottobre 6/2009 #35 Stripy-legs long johnsJalie 2327 Boy's underwear front
Jalie 2327 Boy's underwear boxers
PB290023
Quilt for DS3 (my first ever quilt)
PB290024
Back of quilt
PB290017
Simplicity 2278 Misses slippers size large
PB290014
Pillow case
PB290013
pillow case
PB290012
pillow case
PB290008
pillow case
PB290011
pillow case
PB290020
car caddy
PB290022
car caddy