Saturday, November 5, 2011

Handmade slippers - Simplicity 2278 Misses slippers

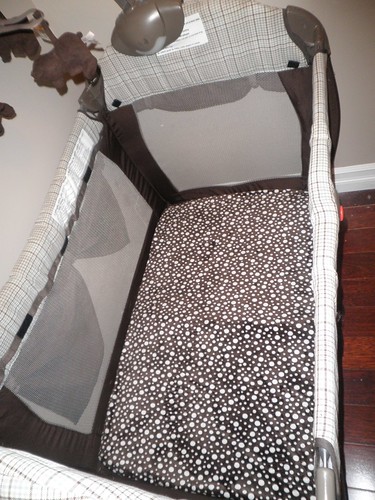
I decided a needed a quick and fairly simple project as I haven't sewn anything in over a month, which is totally to be expected with a newborn baby! I know that there are tutorials on the internet that explain in detail how to draft your own slipper pattern but I wanted simple, so I decided to splurge for the Simplicity #2278 pattern when it went on sale at my local fabric shop.

Simplicity 2278 Misses slippers

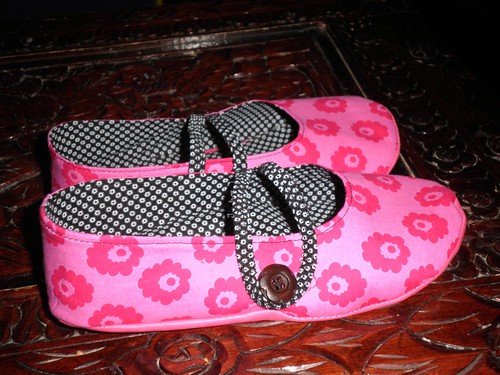
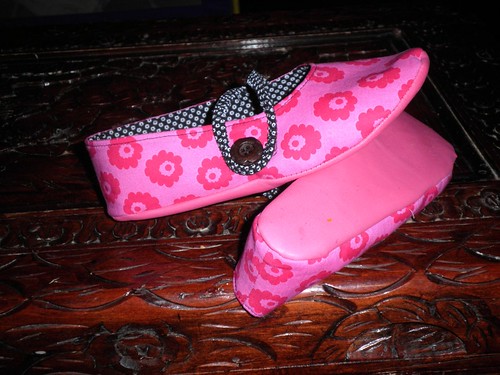
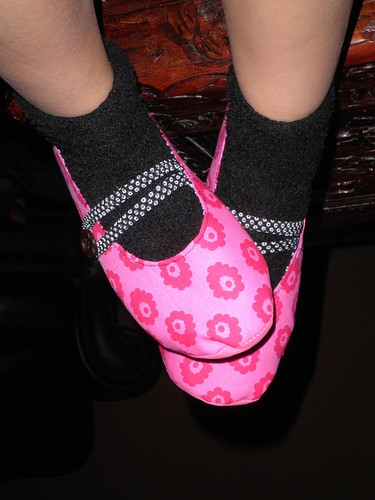
I decided to use leather for the sole instead of jiffy grip as I had it on hand and it matched perfectly to the pink cotton that I had. Leather is definitely not the easiest thing to sew with and don't suggest it if this is a beginner project. I lined the interior in a contrasting black for dramatic impact. I made one minor change and that was that I omitted the provided strap and instead covered a 10" strip of 1/4" elastic with the contrasting black fabric. This project was actually a draft run to see how it turned out because if it did I was debating on sewing these for Christmas presents for all the woman in our family. It turned out better than expected as you can tell by the pictures. I made one minor mistake (as I was trying to rush it before naptime was over) and that was that I sewed the strap on the left slipper on the wrong side and didn't realize it until I had basted the bottom of the interior and exterior top together :( oh well they still turned out great! I then stitched a beautiful wood flower button onto the slippers so that the elastic would just pull over and loop around it.

Simplicity 2278 Misses slippers

Simplicity 2278 Misses slippers

Simplicity 2278 Misses slippers

Wednesday, October 12, 2011

Play pen cover / sheet

Play pen cover
Here's the play pen cover that I whipped up for ds3 (due any day now). I desperately needed a cover for our play pen as the mattress doesn't have a removable cover. I ended up with stains that I can get out when ds2 was born (see below). I used the following tutorial to make this awesome sheet. For the fabric I used minke as it's a polyester (which repels water and won't penetrate through to the mattress) but also because it's oh so soft. It's great quick and easy project that feels so rewarding!

PA120001

Jalie 2793 Empire waist tunic

Jalie 2793 Empire waist tunic (front)
Made out of rayon knit. I love this pattern. I'm not really sure if it will fit me after the baby's born but luckily I had wrote down my pre-pregnancy measurements. I did leave off the modesty panel and the back ties.

Jalie 2793 Empire waist tunic (neckline)

Jalie 2793 Empire waist tunic (back)

Friday, September 30, 2011

Ottobre Woman 5/2010 #11 Nanette Feminine pea coat (in progress)

Ottobre 5/2010 #11 Nanette feminine peacoat
Here's one of my favourite projects thus far. Don't get me wrong I hated actually sewing it as I wasn't experienced enough to know a lot of the techniques that were in this pattern, but I decided to dive in and give it a try. It's still not totally complete as I still have to add the buttons to the front (but that will have to wait until after ds#3 is born.
And here's the back view of it.

P9290004

Ottobre Woman 5/2011 #4 Everyday Scoop Neck raglan shirt

Ottobre woman 5/2011 #4 Everyday Scoop Neck
Here's one of my latest creations. I do like this top but I really thought that it would have been more tailored or slime fitting. A forewarning though, it's a pretty low cut shirt, so if you want it to be higher you might want to raise the front neckline. I also used jersey knit for the binding instead of ribbing. I'm actually quite please with the result of it. I did make some changes to the pattern though. I left off the pocket and lengthened the sleeves, back and front panels all by 2" so that I could leave off the ribbed cuffs to the hemline and arms, mostly because I didn't have the right colour of the ribbing to match the shirt. This was made using a 34cm size with 1/4" added for seam allowance.

Coverstitching using an Generic Industrial Binder and mac tac

Coverstitching is the two or three rows of stitching at the bottom of hems to knit shirts and pants. It is often seen on the bottom hemline of a t-shirt. Now you may ask why do you need to have a coverstitching machine. Well technically you don't, but it makes life a whole bunch easier when sewing with knits. You can also apply your own pre-cut binding strips in one easy pass through a binder attachment, then sew up the side seam for a quick and easy binding application.

Ottobre 2/2007 #2 3/4 sleeve tshirt coverstitching

So how do I set it up? (this is for a Janome 1000cpx coverstitching machine but am sure the principals are the same for other machines, you just might have to fiddle around with the tensions a bit.) The binder's bottom bracket should be inline with the left needle but it should also be slightly to the right of the upper bracket. You can determine accuracy if you use a clear foot as all the needle positions are on that foot. Here the binder is adhered to the extension table using mac tac. I usually use the first two needles from left to right for attaching binding. The settings I use are as follows, 4 for the needles and 3 for the lower looper. The differential feed is set to 1 and the stitch length is set to 3.5 . You might have to turn down the tension of the lower looper when going over seams to 1 or 0 and then turn the tension back to 3. Once you have the machine set up just insert your binding into the attachment and test it first. If you are using jersey knit as a binding it really helps to using spray starch to prevent rolling of the material, as it's notorious for rolling. When your sure that you have the correct tensions, sew up your shirt leaving one side seam (at the shoulder or back) open. Insert the shirt into the attachment between the upper and lower brackets, sandwiching the binding onto the shirt. When completed sew/serge your seam together. Take a small crochet hook and weave the threads through about 1/2" then tie off. Sew up the rest of you shirt. The link below (which is the same pictures as below, just shows you were the bottom bracket is - you will have to scroll over the picture for a highlight. The screws on the attachment are what move the upper and lower brackets. Once you have them set up don't touch them. Happy coverstitching!

Janome coverpro with generic binder

Sunday, September 25, 2011

Ottobre woman 2/2007 #2 (3/4 sleeve t-shirt)

Ottobre 2/2007 #2 3/4 sleeve tshirt
Here's my newest creation! A new shirt for mama. I traced a 36cm but then decided that it may be to big so didn't add a seam allowance to it. A lot of my clothes are starting to show signs of wear (I so promised myself I would never look frumpy but then again that was before becoming a mom :) ) I love wearing these types of tees under my sweater in winter so I decided to give this pattern a go. It's a really simple pattern. I did however omit the side sleeve slits and apply the neck binding using my coverstitch machine. The binding I am most happy with as this was the first time that I have used the same material as the shirt (this was lightweight cotton interlock) and it turned out so nice. My dh couldn't even tell that I made it :) , which is definitely a complement because dh is very observation to small details. Here's what the closeup of the coverstitching looks like.
Ottobre 2/2007 #2 3/4 sleeve tshirt coverstitching
Anyways, the pattern itself I was hoping to be a little more fitting. As you can tell by the next picture it isn't meant to be a closely fitting top. Since I'm 36weeks pregnant it's difficult right now to tell if I may need to take adjustments. So I compared it to one of my favourite tees from Smart Set (in brown), which is an extra small. Yikes....not all tops are created equal!
Comparison of ottobre 2/2007 #2 to xs shirt

Monday, September 19, 2011

Sewing madness!

Last week (since the kids were born) I had a whole day to myself. I spent it just sewing. It sure was nice to be able to get things accomplished all in one day.

I first started out with ottobre 4/2006 #8 Velour pants for my niece's 2nd birthday. I love the design of these. They have a unique oval shape in the rear, on a traditional pants pattern. I did leave out the leg elastic as I'm not a huge fan of it as well as the topstitching.
Here's the back view of them.

Ottobre 4/2006 #8 Velour pants back view
Here's the front view of them


Ottobre 4/2006 #8 Velour pants front

I also got three new pairs of the New Look 6411 done for ds1

New look 6411

New look 6411

New Look 6641 Pants

I also sewed up Ottobre's 6/2009 #36 Mocking Bird Nightdress for my niece's Christmas present. It's made out of pink interlock with a scrap of jersey/lycra knit for the sleeves, black ribbing and coverstitch in contrasting pink and black stitching. I love the end result!


Ottobre 6/2009 #36 Mocking bird Nightdress

I decided that it didn't need any embroidery or applique to the front of it, so instead added a cute little princess crown handmade label to it.


Handmade label for nieces christmas present

I also made a pair of capris from Ottobre Woman 5/2010 #20 Clara capris. I still have to add the elastic to the waistband and topstitch the waistband done but it is mostly down. I made it out of 100% poly knit terry. It's really comfortable but threads love to stick to it - hum....note to self don't sew with them on!


Ottobre woman #20 Clara capris -unfinished yet

Friday, September 9, 2011

ottobre 6/2007 wrap around and modified overalls

Ottobre 6/2007 Wraparound jacket / modified overalls
Here's ds#3 coming home outfit. What a pita this one was to make. The patterns are great just my own silly mistakes. The binding for the overalls which I initially made (see below) was too difficult to turn the tabs so instead I made the tabs more into a tear-dropped shape then stitched the excess underneath.

Ottobre 6/2007 Overalls for a premature baby
In the end I had to cut off the overall part because of my own eagerness to get snap happy with my new snap press. I didn't re-enforce it properly (despite testing) and was left with gapping holes in the tabs....I know...all that coverstitching...yikes. Lesson learned! In the end I am happy with the results as the overalls (in my opinion) aren't really practical with a newborn anyways. If I were to do the overalls again I would add more of a seam allowance in order to add snaps around the crotch area to make it more accessible for diaper changes.

Thursday, September 1, 2011

New Look 6410

New look 6410 (front view)
I made this for my mother-in-law's birthday this year. It's made out of a plaid twill which was given to me by her), and then a lightweight linen or rayon blend (not exactly sure). This was a learning experience for me as I never have done a lapped zipper before. I did cheat a bit on the waist as I was being lazy and didn't want to hand-sew the interior down for a cleaner finish. My theory is that you can't see it anyways, and also because I didn't want to go through all the trouble if her measurements were off :) {a lesson that I learned from the regency dress that I made for her - apparently by using only 1/4" of the 5/8" seam allowance it makes you a smaller size - LOL.}
Here's the lapped zipper
New look 6410 (lapped zipper)

Thursday, August 4, 2011

Ottobre - Elephants pj set

P8030009
I decided to do elephants on my ds2 pj set. He's in love with elephants right now. I thought about also adding an applique to it but decided that I liked it just the way that it was. When he saw the elephants on the labels that I made he got so excited.

P8040021

P8040020
The pants are made out of 100% cotton rib knit with ribbing in white for the cuffs. I do love the rib knit for these pants especially because we cloth diaper and it stretches enough to go over the big diaper bum that he has at night time.I didn't follow the directions for waistband as I just serged then coverstitched it into place. This method is super easy and super quick.

Wednesday, July 27, 2011

DS#1 Requested

P7270012

to have the same pj set as ds#2 but I didn't have enough of the navy blue interlock to do the pants. However, I found an extra piece in the scrap bin to make the sleeves so that I could use the rest of the striped jersey to make a pair of pants out of. My ds#1 then decided after all that he wanted superman instead of the blue jay embroidery. He also specified these labels to match...

P7270016

Tuesday, July 26, 2011

Blue Jay PJ Set

Ottobre Night owl jersey Tshirt/pj top 6/2009 #35 and Stripy legs long johns/pj #36 set
Here's ds2's new pjs. He's in love with birds right now so I though an embroidered blue jay would tickle his fancy. It's made out of navy blue combed cotton interlock and navy blue ribbed knit for the cuffs and neck binding. It was all coverstitched (2-thread narrow) in a contrasting bright blue. I reversed coverstitched the waistband of the pants and the shirt's hemline. I just love the result and ds2 does too. Well so does ds1 who has asked for the same pj set and one with a bumble bee too!

Friday, July 22, 2011

Fall Outfit for DS2

Fall Outfit for ds2

Here's my second son's new outfit for the fall. I really have no idea what sparked me to make fall stuff when it's so freaking hot outside but I am so glad that I did. The sweater is from ottobre's 4/2007 #11 hooded sweater and the pants are from ottobre's new issue 4/2011 #7 Mickey Mouse pants. I really do love this outfit and am just hoping that the pants material stand up to at least one season. I'm not sure if it was a bad fabric or what but I ended up having to topstitch all the seams with my coverstitch machine as the seams just tore apart when stress was put on it, despite a perfect stitch. A while back I made ds1 an outfit using the brown organic bamboo valour that I got from the same place as the orange. The brown one has stood up to much abuse but hopefully my attempt to fix this fabric flaw will stand up. Fingers crossed. I originally bought it to make cloth diapers for ds2 but had a ton of materials left over so this was the perfect project for them.

I also added newly hand made labels of a fish, as ds2 loves fishes right now. I got vectors from the net and then added "hand made" under it. I then heat pressed them onto twill tape. They turned out so good.
Handmade sewing label

Saturday, July 2, 2011

Mama's New Maternity Bathing Suit

We are planning on taking the kids to a water-park next week, so of course mama needed a new bathing suit. I just couldn't bear to show of my naked belly (although I totally admire those of you who can). I recently purchased this bathing suit fabric for less than $4.00 per/yard a couple of months ago (as my local fabricland sells bathing suit fabric for a hefty $18 per/metre (ouchy). I have never sewn with this material before but it sure was a learning curve. I did end up using my wooly nylon that I got from thread art a while back. It was sure a pain to thread though and remember reading somewhere to put nail polish on it in order to thread it. So I pulled the thread tautly and brushed my dark red nail polish on. I then let it dry for about 20 minutes while I cut out the fabric. It worked like a charm! I thread it through both loopers. I did notice that my tension or something was off but it wasn't a big deal to me. The whole dress/top cost $4 to make! It was a pain however to figure out the binding of the same material on my coverstitch machine. I'm not totally sure why it randomly runs off, despite trying to change the pressure foot, but I got it to work and just in time. The pattern is a modified Ottobre 5/2009 "Bloom Camisole". I added 1/4" to each side seam and lengthened it by 4". I then did a rolled lettuce edge. The binding is actually supposed to have tension adjusters put in but I only had enough to put up to my neck. I then added an o-ring and added more length. I'm actually really please with how it turned out, especially with all the new things that I was trying to learn.

Tuesday, June 28, 2011

Ottobre 3/2006 3/4 length pants #12

Wow....it seems like ages since I've posted here. I haven't been up to as much sewing as I would like to but that's probably due to being pregnant. This has been my latest creation for ds1 when he told me he wanted me to make him a flash shirt and matching pants in red with orange stitching. I couldn't say no to a 3.5 year old being so sweet and wanting mommy to make him something.

Friday, February 25, 2011

Ottobre Raglan T-shirt 2/2005 / sewing pattern kwik sew

Raglan TShirt 2/2005
So the race is now on to make ds1 a stash of tshirts for summer as he doesn't have any that fit him. I unofficially vowed to make him his wardrobe this summer as 1. i love seeing things on him that I make 2. it's cheaper than even used sometimes, although I always acquire more stash fabric this way ;) which is still a bonus 3. I just want to see if I can do it. I think that this is do-able. I already know that he has enough shorts so he doesn't need any of those, although I am planning on making him at least one pair to match this shirt.

I did make this tshirt in size 98cm which is roughly a 4t (although ds is 3) but found it a little bit wide even for a 4t. If I were to make this one again I would use the 4t length but maybe go down a size or two in the width. I did love this pattern though. It went together nicely and effortlessly. Another great pattern from ottobre....geez....you'd think that I work for this because that all I sew from for the kids (LOL)

This shirt was done in a 98%cotton 3%lycra and I have to agree with a lot of other sewists on this one that I love the feel of the cotton with the lycra. It cost me $3.98 a yard and I used maybe a 1/4 of a yard (guessing though) So it cost say $1 to make which is a lot cheaper than $4-7 dollars of used tshirt that they want from our local consignment store. Yes, if you take into account the time factor well it's not really worth it but I love sewing, and it's an enjoyable hobby. Although I have to admit I also do it to save the family $$$ which is always an added bonus.

I also appliqued some prewashed lightweight linen that I will use to make ds1 some shorts in the near future (I already have pattern traced although might have to trace it in a smaller size). The applique turned out pretty well although I would strongly advise using a medium weight linen and not a lightweight as it frayed from the embroidery needle that I had to hand stitch anyways. I'm also not so happy with the location of the frog. I intended for it to be higher up on the tshirt but once again wasn't paying attention when I was hooping it (to busy trying to get it done well dh was watching the children) . Ah well, lesson learned. I did however learn that instead of using spray adhesive (which I despise now as it's all over my floor and counter and cutting mat-which is not coming out) I hoop a heavy weight cutaway then ironed on tearaway stabilizer to the back of the shirt and pinned it onto the hooped heavy weight cutaway. It worked perfectly which no offset stitching. I will definitely use this method again.

6015g6e_19
Onto my excite find of the month! I got over 120 vintage kwik sew patterns from kijiji today. There are also doubles of most of the patterns for each sizing grade. There were a lot of men's stuff in the lot which I was seriously lacking in my patterns. I really don't think that I will sew all of them but it's great to have around my sewing room, especially for birthdays and such. I picked up the whole lot for $40. Well worth it if I sew at least 4 outfits from them. Nowadays kwik sew patterns range in price but average is around $11 per pattern.

Monday, February 21, 2011

Jalie 2918 - DS1 Dino Shirt

Jalie 2918
Here's DS1's new shirt. He loves that I can go downstairs and whip him up a new shirt. He's only 3 and picked out the embroidery design, ribbing and shirt material. The shirt is made out of black interlock and organic cotton ribbing in green. It's coverstitched with orange which you can't really see in the picture but is a really nice contrast. He said to me the day that I made this, "ma, I need new shirt, go downstairs and make new shirt, pleaze!" I couldn't resist him he's a little angel when he wants to be.

Wednesday, February 16, 2011

Apron

P2160018
Here's a apron that I whipped up for my sister-in-law the other night. It's made out of a linen / cotton blend that I purchased from fabric.com. It cost $3.19 per yard. The whole apron probably cost less than $3 only because I didn't use quite a yard and I had flower print left over from another project. I'm not overly excited about this project. The one thing that I loved about this project was the embroidery design that I used, as it was just so cheerful.
P2140005
Currently I've been working on a shirt for ds1. He desperately needs some shirts and it's cheaper for me to make them. They want $4.00 for a used shirt at my local consignment store.

Friday, February 11, 2011

Burda 8501

Unfortunately, I had to rush DS1 to the hospital last night as he had a pvc pipe (from his minnie hockey net) in his mouth and fell on it. He turned out to be alright, no stitches required but it did leave a nasty gash both under his tongue and on his soft palette. He's on antibiotics to prevent infection and a fluid diet until it heals. Poor little guy! So, I wasn't able to complete my tunic yesterday but I did get it done today.

Burda 8501 Front (untied)
I did view A of the pattern in a lightweight linen that I got from fabric.com after Christmas when they had a huge sale. I love this shirt. Please pardon the right shoulder seam, as I have not pressed it yet and it's just not laying right because of it. It really doesn't look that puffy.

Here's the shirt tied up.

burda 8501 front (tied up)
I can't wait to be able to wear this. It's so freaking cold here right now, that I can't wait for Summer to come.

Wednesday, February 9, 2011

Sewing plan Update - Burda 8501

I started the Burda tunic pattern 8501 that was first on my list, last night. I decided to first make a muslin mostly because I didn't want to ruin the nice black linen that I wanted to use for it. I'm so glad that I did. I started out with a size 36, mostly because it was already pre-cut from the hugh lot of sewing patterns I got a few weeks ago, but also because I'm a C cup size and the description said that it was closely fitting. So I thought that I would be generous with the sizing. This was the result.


Photo on 2011-02-07 at 22.50 #2
Closely fitting? I don't think that describes this!

Photo on 2011-02-07 at 22.50
In RTW clothing I'm an xs-s in shirts, however I usually buy knits for shirting because of my "Fitting issues". I am very petite but have a large bustline (I'm not complaining) which makes it very difficult to fit clothes properly. I hardly make things for myself, mostly because I enjoy making things for the boys (hubby included) but this year I made a vow to make a few summer things for myself. I decided to take off I think about 1" from the front seamline and shorten the length by 1", which nicely moved in the bust dart to the exact location of where it should sit.
Funny thing was that I was surfing the net, to find other finished projects with this pattern and came across Burda 8516 here. This pattern is identical to the pattern that I am currently working on. The only difference is that they leave off the darts in the front and add elastic to the empire waistline. I was shocked to see something so similar but really shouldn't be.

Today I was able to get most of the shirt completed. I finished all the darts, shoulder seams and side seams. I still have to set in the sleeves, finish the neckline and hem. I really have to admit thought, that their directions for how to finish the neckline is very difficult to understand. I will figure it out, I will, I will , I will! But I still think that it's a foreign language yet to be discovered. Hopefully, I'll have completed it by tomorrow.


Thursday, February 3, 2011

Spring/Summer Sewing Plan

UPDATED: Feb 22/2010 **** Yesterday I found out I am pregnant again with our third child. So I will have to revise my sewing plan because well there really isn't a reason to make anything for myself until I know for certain how far along I am. I'm assuming that I will be like 6-7months along in the summer so I might need some tshirts and tanks but until I know for sure I'm postponing stuff for myself.

I haven't been sewing at all in recent weeks because I'm overwhelming myself with all the stuff that I want to accomplish but haven't. I haven't sewn very much for myself and thought that I should start only because I have never had anything properly. I have decided that I need to make a plan. Everything starts somewhere. Here we go!


1. Burda 8501 view A (Completed)
- Fabric: Black lightweight linen
- design details: white machine embroidery at bottom hemline


2. Vintage Simplicity 6615 view #2 (Shirt only)
- Fabric: Yellow linen
- design details: no sleeve cuffs, embroidery to neckline

3. Short (no idea what pattern or fabric)


4. Vogue V2907 View B
-Fabric: ?
-Design details:?


1. Ottobre Design Magazine 3/2009 #23
- Fabric: Olive green Lightweight linen
- Design details: frog at bottom left pant


2. Ottobre Raglan Tshirt 2/2005 #5 (Completed)
-fabric: blue with brown ribbing
- Design details: frog on shoulder


3. Ottobre Plaid pants 2/2003
- Fabric: Linen/cotton blend, brown plaid
- Design Details: add strip to interior seam at 3/4" and buttons to roll pants into shorts


4. Kwik Sew 3298 - Men's underwear (Completed)


Friday, January 28, 2011

Mommy's new sundress

P1280015
I picked up the fabric for this dress about a year ago. I loved the colours in it although had no idea what I was going to do with it. I decided to just wing it. I used the top portion of the Ottobre woman's bloom cami that I made a little while back. Then added a circle skirt to the underbust. I just used a tutorial that I found here, only the measurements I used were based on the circumference of the underbust measurements. I still have to hem the bottom of it but am still contemplating whether to do a rolled hem or a coverstitch hem. I made the mistake of adding 1/4" more to the seam allowanced on the top as the previous cami that I made, was a bit snug but I neglected to take into consideration that the fabric here had more stretch then the previous fabric that I used for the cami. It still turned out nice though and am definitely impressed with the results, although I may add a little elastic to the underbust so that it fit more snugly.